🌊🐠🌿 Dive into the World of Aquascaping with Hakkai's Iwagumi Workshop! 🌿🐠🌊
Are you passionate about aquascaping and eager to create your own breathtaking underwater paradise? Look no further! Hakkai's Iwagumi Aquascape Workshop is the ultimate experience you've been searching for! 💦🌟
📣 JOIN US NOW! Secure your spot at: https://hakkai.com/products/iwagumi-aquascape-workshop 📣
Explore the enchanting world of Iwagumi Aquascaping, an elegant Japanese art form that captures the essence of nature and transforms it into mesmerizing underwater landscapes. 🇯🇵🎨🏞
🌟 What to Expect at Our Iwagumi Aquascape Workshop? 🌟
👩🏫 Expert Guidance: Our passionate and knowledgeable instructors will guide you step-by-step through the entire process of creating a stunning Iwagumi Aquascape.
🙌 Hands-On Experience: Get up close and personal with the art of aquascaping! Learn about the principles of Iwagumi design, plant selection, and how to arrange hardscape materials like rocks and wood.
🎁 Starter Kit: Don't worry about bringing anything! We'll provide you with a comprehensive starter kit, including a tank, rocks, plants, and more!
👨👩👧👦 Connect with Fellow Hobbyists: Share this unforgettable experience with like-minded individuals who share your love for aquascaping! Build lasting friendships and expand your network.
🏆 Exclusive Perks: As a workshop participant, enjoy a discount to filter and/or light purchases at Pet Zone SD!
🔥 LIMITED SEATS AVAILABLE! Don't miss this opportunity to take your aquascaping skills to the next level! 🔥
💡 Ignite your creativity, master the art of Iwagumi, and embark on an unforgettable journey with Hakkai's Iwagumi Aquascape Workshop! 💡
🌊 Book your spot today and dive into the incredible world of aquascaping: https://hakkai.com/products/iwagumi-aquascape-workshop 🌊
#HakkaiIwagumiWorkshop #Aquascape #Iwagumi #AquariumDesign #UnderwaterParadise #JoinUsNow
]]>Dutch-style aquascaping is a unique and beautiful way to create an underwater landscape in your aquarium. The origins of Dutch-style aquascaping can be traced back to the Netherlands, where hobbyists and professionals alike have been perfecting the art for decades.
One of the most striking characteristics of Dutch-style aquascaping is the use of a wide variety of plants. Unlike other styles that may focus on a single type of plant or a monochromatic color scheme, Dutch-style aquascaping is characterized by its diversity and abundance of plant life. This creates a lush and natural-looking environment for your fish and invertebrates to thrive in.
Another important aspect of Dutch-style aquascaping is the use of hardscape elements such as rocks, wood, and other natural materials. These elements add depth and dimension to the aquascape, creating a sense of movement and flow. They also provide hiding spots and territory for your aquatic inhabitants.
One of the things that sets Dutch-style aquascaping apart is the attention to detail. Every leaf, every stem, every rock is placed with precision and care. This creates a sense of balance and harmony in the aquascape, making it not just a beautiful display, but also a work of art.
Dutch-style aquascaping is not just about creating a pretty picture, it is about creating a living ecosystem. When done correctly, a Dutch-style aquascape will be not only a visual treat but also a functional habitat for the aquatic life it houses.
But, most importantly, Dutch style aquascape gives soul to your tank, it gives it personality, it makes it come to life. It is like creating your own little underwater garden, and nurturing it. It is a meditative, calming and rewarding hobby.
If you're interested in creating your own Dutch-style aquascape, the best place to start is by learning as much as you can about the different plants and hardscape materials available. With a little patience, practice, and attention to detail, you too can create a beautiful and thriving Dutch-style aquascape that will be the envy of all your friends.
]]>The Iwagumi style, which originated in Japan, is characterized by the use of a limited number of large stones arranged in a natural-looking formation. The goal is to create a sense of movement and flow, as well as to mimic the look of a mountain stream or rocky shoreline.
One of the key elements of Iwagumi style is the use of contrast between light and dark stones. This contrast creates depth and dimension, making the aquascape look more natural and realistic. Another important aspect is the use of negative space, which allows the viewer to appreciate the beauty and simplicity of the rocks and plants.
At Hakkai Aquascape Design Gallery, we carefully select each stone for its unique shape and color, and then arrange them in a way that creates a sense of movement and flow. We also use a variety of plants, including mosses and small ground covers, to add texture and color to the aquascape.
In addition to creating beautiful Iwagumi aquascapes, we also place a strong emphasis on the health and well-being of the aquatic life within them. Our team of experts ensures that the water conditions are perfect for the fish and plants, and that the aquascape is easy to maintain.
If you're interested in creating an Iwagumi style aquascape in your home or office, come visit us at Hakkai Aquascape Design Gallery. Our team of experts would be happy to work with you to design and create a beautiful, natural-looking underwater landscape that you'll be proud to display.
]]>
]]>
For those who missed out on our tall nano tank setup demo the other day, here’s a peek at the tank our teammate put together! Stay tuned as we post updates of this UNS 16T these next couple weeks. 🌱 💦 🪨
]]>
The gallery felt like it needed a nano iwagumi, so I decided to build one in a UNS 20C which is 2 gallons. This definitely limited my hardscape options but it was quite the fun challenge! My build is a bit untraditional in that I only have two "rocks" and more than one species of plant.
------------------------------------------------------------------------------------------------------------------------------------------------------------
Here's what I used!
Hardscape/ equipment/ substrate:
Plants:
Extras and tools:
---------------------------------------------------------------------Arranging the rocks---------------------------------------------------------------------
Just as plants are the focus of the dutch style, rocks are the star of the iwagumi style. I sloped my substrate so that I could create depth and let rocks in the back be more visible. I try to use the rule of thirds to guide my rock placement.
With my selection I struggled to find a single centerpiece or oyaishi stone. I tried multiple types of stones and nothing looked right until I put two stones together to make one bigger stone!
It would be too crowded if I added too much more, so I stuck with one small supporting stone and called it a day. Would you consider that two stones or three stones?
-----------------------------------------------------------------------------Planting-----------------------------------------------------------------------------
I chose two types of hair grass to fill my tank: Eleocharis 'belem' and 'pusilla'. I planted 'belem' in the front half and 'pusilla' in the back half!
Both are low growing foreground plants- I just wanted to see if I could tell the difference between the two species over time. From what I can tell pusilla is growing more upright while belem is curving but we'll see as time continues! In the meantime enjoy the tank ~3 weeks later
]]>
Wabi Kusa is a method of inserting various aquatic plants and mosses into a ball or mat of substrate. Takashi Amano popularized this method as a way of planting large tanks more efficiently. Instead of painstakingly planting each tiny bundle of plants with tweezers he would prepare mats of plants to simply tuck into his tanks. Today we're going to show you how to make you're own ball version that you can rest on top of an aquascape or showcase as the centerpiece of a terrarium!
-------------------------------------------------------------------------Tutorial Time-------------------------------------------------------------------------
Hardscape/equipment/substrate:
Plants
*we recommend using terrarium plants or aquatic plants that can survive outside of the water
Tools
-------------------------------------------------------------------------Lets's make a wabi kusa!-------------------------------------------------------------------------
First we're going to briefly soak our substrate ball in water so that it's easier to work with. Next we're going to insert our plants into the substrate ball. To do so, it's easier to first poke a hole with your tweezers where you want to insert your plants. Then you can push your plants in!
Now we're going to hide our substrate ball with moss. After wetting the moss, temporarily stick the moss to the ball. It's not gonna be perfect, don't worry because our next step is to use the terra line to tie the moss to the substrate ball! Do this by wrapping the line in all different angles around the ball. Finish up by tying it off and you have your very on wabi kusa ball!
-------------------------------------------------------------------------Lets Aquascape!-------------------------------------------------------------------------
Now that we have our very own wabi kusa ball we have a couple options: we can put it in a jar with a bit of water and sand as a terrarium but what we're gonna show you is how to incorporate your wabi kusi ball into an aquascape!
Create your underwater world to your liking and then we're going to lay a piece of spiderwood over the top of our container. We were able to rotate it in a way such that the wabi kusa ball is resting on the wood with just an inch or two of the ball submerged. Everyone's spiderwood is going to be different, so this is your chance to get creative!!
At Hakkai we have wabi kusa workshops where we'll walk you through this whole process starting with making your own wabi kusa ball rather than a premade one! Come get your hands dirty and I hope we see you soon!
]]>
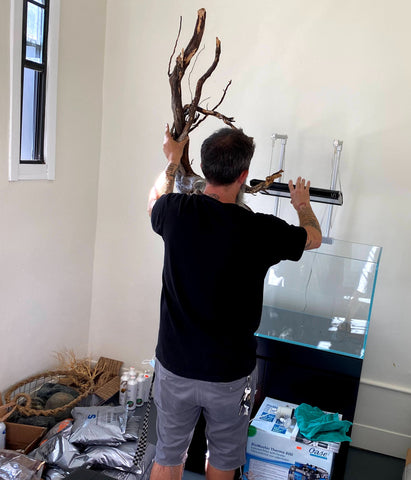
I recently joined the Hakkai/Petzone team and just made my first aquascape featuring this bonsai tree.
Here's what you'll need!
Hardscape/equipment/substrate:
*Any filter, light, tank, and most aquatic soils will work!
Plants:
Extras and tools:
-----------------------------------------------------------------------------Tank preparation---------------------------------------------------------------------------------
I started off by preparing my tank by sprinkling some bacter 100, clear super, and tourmaline BC.
*These three additives will help my tank cycle faster, improve the longevity of my tank, and promote a healthy microbiome. They aren't 100% necessary but are highly recommended!
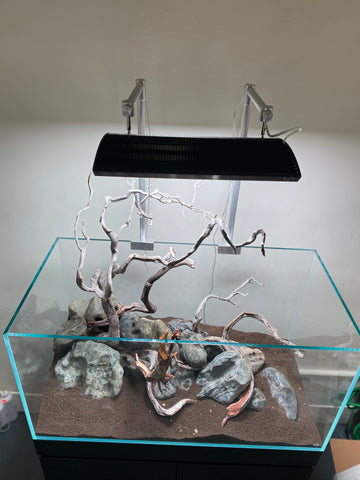
I then added a layer of power sand which is a porous substrate that will also promote microbial growth and slowly release precious nutrients to your plants. On top of that, I poured about an inch of controsoil. My tank was a little shallow for the bonzai tree so I kept the soil flat, but if you have a deeper tank I think it would be fun to play around with slopes!
-------------------------------------------------------------------------------------Plants---------------------------------------------------------------------------------------
Moving onto the plants! I started with the anubias by cutting off any dead or decaying leaves. Then, I was able to pull off propogations with tweezers and trimmed the remaining leaves into 3-6 leaf segments. I glued each segment to the bonzai tree while trying to maintain the beautiful layers it naturally had. I tried tucking each segment into the tree before gluing to make sure I liked the layout :) I wasn't sure if it was easier to put to glue on the plant first or onto the tree first, so if you try this out let me know!
I then "planted" the tree into the substrate. I had to push the tree down quite a bit to keep it secure and scooped a bit of controsoil on top of the roots to hold it down
Since I wanted the bonsai tree to be the main focus, I went for a more simple carpeting plant-dwarf hair grass. I divide the tissue culture into small bundles and tried to plant each bundle in a checkerboard pattern using tweezers. It ended up more like two spaced out lines, but I'm sure they'll still carpet!
I then planted the pearlweed along the back of the tank, again spacing them out.
*It was a lot easier to plant after getting the soil a bit damp.
----------------------------------------------------------------------------Finishing up---------------------------------------------------------------------------------------
Once I was happy with my plants, I started to fill up my tank! I used a small rectangular bucket and poured gently. I used my hand to slow the flow, but I've also seen people pour onto plastic bags!
Turns out I didn't plant my plants deep enough and in combination with the loose soil, all my plants floated up ;0 When you do this yourself, plant them as deep as possible! What helped me was squeezing my tweezers many times while slowly taking them out.
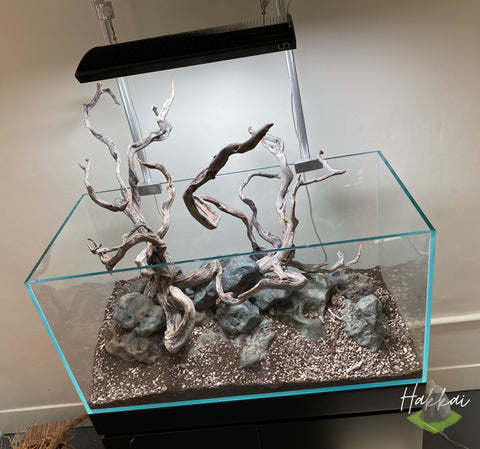
The finishing touch to the tank was a filter and light. What do you think!
]]>We still find satisfaction when piecing together a smaller sized tank. Nano tanks can be designed to where you can scale and give depth despite the low amount of space to work with.
Here's a few nano aquascape tanks we've built here at our Hakkai Aquascape Gallery in Liberty Station Arts District of San Diego!
]]>
We picked an UNS 60U 20 gallon rimless tank and are running the full spectrum high light UNS Titan 1 Planted Tank LED and opted with the original ADA Amazonia Aqua Soil for longetivity as Dutch tanks are highly demanding and require sufficient nutrients along with strong lighting. CO2 is also being directly injected and we opted with the UNS Dual Stage Mini Regulator and went with the durable and nearly unbreakable Aquario Neo Extendable CO2 Diffuser.
This tank was curated and scaped hands-on by just about the entire team as we all got our hands wet and did everything from the initial aquascape rough draft sketch to
Since stems are prominent in the tank and cover everything from mid to background areas, we went with some Rotalas, Bacopas, S. Repens, Dwarf Baby Tears, just to name some aquatic plants.
We're excited to work on a pure Dutch tank that isn't a hybrid aquascape that we normally do at our local fish store. Come check out our Dutch Aquascape once our doors are open here at Hakkai Aquascape Gallery in Liberty Station, San Diego, CA.
]]>Deserie went with some low-tech plants for this tank such as Buce and Dwarf Hair Grass and utilized Tropica Aquarium Soil for the substrate to give it a sleek black on black look with the black glass background on this particular UNS tank model.
She did an amazing job piecing together the Seiryu Stone. Not only does it flow well and balance out the build and give some depth but we can sense some great energy flow and serenity just from viewing her aquascape design here.
Once our doors are open here at Hakkai Aquascape Design Gallery, we welcome you to swing by and say hi, check out our aquascapes and grow in this hobby with us!
Let's give it up for #AquascapingLadies! 👏🏻
]]>
Iwagumi aquascape designs are very minimalist and as a design created by Takashi Amano, the rules if followed by aquascaper purists would be to use only one type of plant, one type of stone and one species of fish.
Plant layout is typically the focal point of many aquascapes but for an Iwagumu tank, the focus is on the stones and its placement within the aquascape. Even numbers are to be avoided as this prevents the symmetry that our human brain tends to deviate towards. Some purist will use exactly three stones or five stones but playing around and not falling into even number quantity is the key to giving it a natural look.
Though the tank has yet to be fully set up (we placed it into the common area corner quite late into the wee hours) with stones and plants, we will scape it over this weekend and post updates along the way so stay tuned, fellow Aquascapers! If you'd like to see in-person progress on this aquascape tank build, you can see it on the west-side entrance of Barracks 19 here in the Arts District of Liberty Station.
**Update: This 40C rimless tank is now an Iwagumi hybrid aquascape put together by our teammate, Noah.
]]>Our teammate Bryan is a very studious aquascaper and forest aquascapes has been something he's constantly working on throughout the years. Though challenging and time consuming, Bryan perseveres and is diligent in the hardscape selection process. Find pieces of driftwood to work with on these aquascapes can be painstaking but it may be hard to find that "perfect piece" and Bryan spends good time crafting the pieces himself by trimming and sawing them into complementary "forest trees."
Though any tank can be used to create a forest style planted tank, the illusion of depth is very critical, especially when the rear part of the tank is crafted to appear as being "far away." The choice of driftwood sizes can also make an impact on this depth appearance in the aquascape. Thicker pieces were picked out by Bryan for the front and smaller pieces in the rear part of the tank. Tom Barr's hand-collected Manzanita Wood is our top choice for many of our planted tanks and exactly what Bryan went with on this UNS 45U tank.
The great part about this depth is the realistic appearance of the sunrise or sundown coming from the rear of the aquarium. We don't know about you, but even though we've been aquascapers in the hobby for many many years now, we are still in awe at the the creations we craft through hardscape, aquatic plants, substrate and other natural goodies from Mother Nature.
Here are some pics from this week's Forest Aquascape tank build here at our aquascape gallery in Point Loma, San Diego, CA.
And there we have it! Bryan's face during his serene aquascaping session shows contentment with the results.
]]>Our teammate Patrick is very meticulous when it comes to hardscape selection and placement and when it comes to a tank of this size, the overall layout and placement of hardscape and even substrate can make a difference in the long-term appearance of an aquascape.
Stay tuned as Patrick works his magic on this 44 gallon tank here at our aquascape gallery in Barracks 19 of Arts District Liberty Station, Point Loma, San Diego, CA.
]]>The goal of a biotope tank is to bring the environment to as close as it can get to a fish or invert's natural habitat. Not only does this give focus to the aquatic inhabitants but it also makes it easier to attain the water parameters that many natural biotope fish demand.
Our teammate Orlando has a special place in his heart for Dwarf Cichlids such as Apistogrammas. He utilized layers of El Jeje Stone (collected from our good friend Dr. Tom Barr) with many intricate and nonuniform branches and twigs of Manzanita Driftwood along with locally sourced guava leaves (from his own backyard guava tree) to mimic leaf litter found in the natural waterways.
The biotope aquascape build utilizes a lot of creaks and crevices and resembles the many caves and corners that Apistos usually dwell in when in their natural environment in the wild.
Here are some pictures and documentation of the build during the first few hours of the aquascaping build of this gorgeous biotope tank Orlando worked on this week here at Hakkai Aquascape Gallery.
]]>
Our teammate Noah put together an array of plants, hardscape and layout material just a day before the tank arrived.
It took around 4-5 hours to finish the tank from unboxing to attaching the moss onto the wabi-kusa wall and getting the substrate in there to plant and after the tank was completed, the final touch was the turn on the fogger and lights!
Here are some pics we snapped to document the entire build process here at our aquascape gallery in Point Loma, San Diego, CA.
]]>